Ordering Info

Take a look at some of my creations and what's on the menu at www.heartofthebatter.com

To order cakes, cupcakes or cake pops please contact me at carina@heartofthebatter.com

You can also find me on facebook by searching Heart of the Batter

Saturday, August 6, 2011

Rhubarb & Ginger Cupcakes - Recipe

For the cupcakes:
1 cup unsalted butter, softened
1 cup confectioners/icing sugar
2 cups self-rising flour
4 eggs
1 tsp. vanilla extract
1 cup cooked rhubarb, chopped into small pieces

1. Preheat the oven to 400F. Combine all cupcake ingredients (except for the rhubarb), in a medium bowl and beat with an electric mixer for 2-3 minutes. Spoon about 1/4 cup of batter into each well of a muffin tin lined with baking cups. Bake for 20 minutes. Remove pans from the oven and cool for 5 minutes. Remove the cupcakes from the pan and cool on a wire rack for an additional 25 minutes. Using a melon baller, apple corer, or cupcake corer, make a small well in the center of each cupcake. Fill each hole with a heaping teaspoon of rhubarb.

For the frosting:
1 cup cream cheese, softened
(or try tofutti 'better than cream cheese' for a dairy free alternative to cream cheese)
1 1/2 cups confectioners/icing sugar, sifted
1 tbsp. lime juice
1/2 tsp. ground ginger
1 1/2 tbsp roughly chopped candied ginger

2. Combine the cream cheese and confectioners sugar in a medium bowl, and beat with an electric mixer until soft and creamy. Add the lime juice, and ground ginger, and mix well. Frost each cupcake with a beveled spatula or knife. Sprinkle with a little chopped candied ginger.

Makes approximately 18 cupcakes

Friday, August 5, 2011

Grapefruit & Orange Syrup Cupcakes - Recipe

for the cupcakes:
2 medium, seedless, sweet oranges - peeled and roughly chopped (save the rind for later)
1/2 cup unsalted butter
1 cup confectioners/icing sugar
2 eggs
1/2 cup semolina
1/2 cup almond meal
1/2 cup self-rising flour
2 tbsp. grapefruit juice (save the zest for later)

1. Preheat the oven to 325F. In a saucepan, cover the oranges with water. Simmer until tender, about 15 minutes. Remove from heat, and set aside to cool. Drain the oranges and puree in a food processor with the grapefruit juice. In a bowl, beat the butter and sugar with an electric mixer until light. Slowly beat in the eggs. Stir in the rest of the ingredients, along with the orange/lemon puree, until well combined. Spoon about 1/4 cup of batter into each well of a muffin tin lined with baking cups. Bake for 35 minutes. Remove pan from the oven and cool for 30 minutes.

for the syrup:
1 peeled orange rind (from the orange used in the cupcake recipe)
1/2 cup confectioners/icing sugar
1 cup water
grapefruit zest (about 1/2 medium grapefruit's worth)

2. Thinly slice the orange rind, removing the pith. Cut the orange rind into thin strips. In a pan, bring the sugar and water to a simmer, stirring to dissolve the sugar. Add the orange strips and grapefruit zest and boil uncovered for about 5 minutes (or until tender). Spoon the syrup onto each cupcake, allow to soak through.

Makes approximately 12 cupcakes

Thursday, August 4, 2011

Blood Orange Syrup Cupcakes - Recipe

for the cupcakes:
2 medium blood oranges - peeled and roughly chopped (save the rind for later)
1/2 cup unsalted butter
1 cup confectioners/icing sugar
2 eggs
1/2 cup semolina
1/2 cup almond meal
1/2 cup self-rising flour

1. Preheat the oven to 325F. In a saucepan, cover the oranges with water. Simmer until tender, about 15 minutes. Remove from heat, and set aside to cool. Drain the oranges and puree in a food processor. In a bowl, beat the butter and sugar with an electric mixer until light. Slowly beat in the eggs. Stir in the rest of the ingredients, along with the orange puree, until well combined. Spoon about 1/4 cup of batter into each well of a muffin tin lined with baking cups. Bake for 35 minutes. Remove pan from the oven and cool for 30 minutes.

for the syrup:
1 peeled orange rind (from the orange used in the cupcake recipe)
1/2 cup confectioners/icing sugar
1 cup water

2. Thinly slice the orange rind, removing the pith. Cut the orange rind into thin strips. In a pan, bring the sugar and water to a simmer, stirring to dissolve the sugar. Add the orange strips and boil uncovered for about 5 minutes (or until tender). Spoon the syrup onto each cupcake, allow to soak through.

Makes approximately 12 cupcakes

Wednesday, August 3, 2011

Orange & Lemon Syrup Cupcakes - Recipe

for the cupcakes:
2 medium, seedless, sweet oranges - peeled and roughly chopped (save the rind for later)
1/2 cup unsalted butter
1 cup confectioners/icing sugar
2 eggs
1/2 cup semolina
1/2 cup almond meal
1/2 cup self-rising flour
2 tbsp. lemon juice (save the zest for later)

1. Preheat the oven to 325F. In a saucepan, cover the oranges with water. Simmer until tender, about 15 minutes. Remove from heat, and set aside to cool. Drain the oranges and puree in a food processor with the lemon juice. In a bowl, beat the butter and sugar with an electric mixer until light. Slowly beat in the eggs. Stir in the rest of the ingredients, along with the orange/lemon puree, until well combined. Spoon about 1/4 cup of batter into each well of a muffin tin lined with baking cups. Bake for 35 minutes. Remove pan from the oven and cool for 30 minutes.

for the syrup:
1 peeled orange rind (from the orange used in the cupcake recipe)
1/2 cup confectioners/icing sugar
1 cup water
lemon zest (about 1 medium lemon's worth)

2. Thinly slice the orange rind, removing the pith. Cut the orange rind into thin strips. In a pan, bring the sugar and water to a simmer, stirring to dissolve the sugar. Add the orange strips and lemon zest and boil uncovered for about 5 minutes (or until tender). Spoon the syrup onto each cupcake, allow to soak through.

Makes approximately 12 cupcakes

Tuesday, August 2, 2011

Spanish Orange Syrup Cupcakes - Recipe

for the cupcakes:
2 medium, seedless, sweet oranges - peeled and roughly chopped (save the rind for later)
1/2 cup unsalted butter
1 cup confectioners/icing sugar
2 eggs
1/2 cup semolina
1/2 cup almond meal
1/2 cup self-rising flour

1. Preheat the oven to 325F. In a saucepan, cover the oranges with water. Simmer until tender, about 15 minutes. Remove from heat, and set aside to cool. Drain the oranges and puree in a food processor. In a bowl, beat the butter and sugar with an electric mixer until light. Slowly beat in the eggs. Stir in the rest of the ingredients, along with the orange puree, until well combined. Spoon about 1/4 cup of batter into each well of a muffin tin lined with baking cups. Bake for 35 minutes. Remove pan from the oven and cool for 30 minutes.

for the syrup:
1 peeled orange rind (from the orange used in the cupcake recipe)
1/2 cup confectioners/icing sugar
1 cup water

2. Thinly slice the orange rind, removing the pith. Cut the orange rind into thin strips. In a pan, bring the sugar and water to a simmer, stirring to dissolve the sugar. Add the orange strips and boil uncovered for about 5 minutes (or until tender). Spoon the syrup onto each cupcake, allow to soak through.

Makes approximately 12 cupcakes

Monday, August 1, 2011

Blueberry & Coffee Muffins - Recipe

2 tbsp. boiling water
2 tbsp. instant coffee granules
1 tbsp. milk
1/2 cup unsalted butter, melted
3 tbsp. almonds, chopped
3 1/2 cups self-rising flour
1 1/3 cups confectioners/icing sugar
1 tsp. baking soda
2 eggs, lightly beaten
1 1/2 cups buttermilk
1 cup fresh blueberries

Preheat the oven to 400F. In a cup or small bowl, pour 2 tbsp of boiling water over the instant coffee. Stir in the milk (not the buttermilk) , and set aside to cool. In a medium bowl, mix the almonds, flour, sugar,, and baking soda with a spoon or whisk. In a large bowl, beat the eggs and buttermilk with an electric mixer until well combined (about 2-3 minutes). Stir in the cooled coffee. Add the flour mixture into the buttermilk mixture stirring with a spoon or whisk until nearly combined. Gently fold in the blueberries with a large spoon or spatula until evenly dispersed. Spoon about 1/4 cup of batter into each well of a muffin tin lined with baking cups. Bake for 18-22 minutes. Remove pan from the oven. Cool muffins for 10 minutes, then remove from the pan. *These muffins are best served warm.*

Makes approximately 12 muffins

Sunday, July 31, 2011

Kitchen Creations - July

Hello you beautiful bakers, you!

If you've stopped by recently, I'm sure you've seen this month has been a little less baking and little more traveling (which of course means a little more shopping too)! So this time I'll be sharing with you some of the things I've been up to and some of the things I've been buying.

So first this month, a new friend of mine (who just got engaged!) asked me to make some pops for the engagement party... and of course my answer was 'Heck yes!' She asked me to make some purple pops for her and some blue pops for her fiance. Since it was a fancier occasion, I decided to jazz them up a little in these glass containers with some shimmering rocks in the bottom.
We put his initial on her pops and her initial on his pops and shimmered them up with some pearl dust. So pretty! Congrats guys! If you need someone to make your wedding cake, you know who to call... *wink wink*

Then my dear friend, who's wedding cake I did make, (over a year ago - wow, has the time flown) asked me to do a cake for her grandma. Sweet Grandma loves my cakes so much she just sits and stares at them. One time she took some cupcakes home and refused to eat them because they were too beautiful. But I promise this time, she ate her cake, because it was her 85th Birthday cake!  This lovely lady enjoys gardening and loves flowers, so I created a lovely basket weave cake adorned with lots of flowers and a few sweet butterflies.
I'm sure you can already guess, that Grandma LOVED her cake! Happy Birthday (to one of my biggest fans).

While I was going to be away a friend from work was having her 25th Birthday, so I couldn't leave without giving her a little something. So I asked for her favorite colour and flavor and popped out my favorite happy birthday cupcakes.
Triple chocolate cupcakes with yellow baking cups and yellow chocolate picks spelling out happy birthday. They didn't even last until her birthday... guess they couldn't have tasted too good, huh? (haha)

After that of course, I went on my trip, and did more tasting, and shopping. I was on a business trip in Vancouver, so there wasn't much time for shopping there...but I did manage to find one thing that's pretty neat. Maybe you've heard of it...? It's called 'the cupcake pen'. It is a canister, somewhat like a reusable water bottle, you can mix your ingredients right in the bottle, or pour them in through the screw off bottom. Then it works something like this...
I measured out the first cup, using a measuring cup, to get the batter amount I usually use, then used the cupcake pen to squirt out the rest, eyeballing it, to get about the same amount of batter in each cup. It took me 2-3 minutes to fill all 12 cups in the muffin pan. Pretty darn fast, as far as I'm concerned. AND quick and clean. The spout is large enough to squirt out mini chocolate chips (as you can see in this banana chocolate chip batter I'm baking). The cupcake pen retails for $15-20 dollars and I would highly recommend it for bakers who tend to make about 12 or less cupcakes at a time (the pen holds enough batter to make 12 cupcakes), its easy to hold and squeeze (if your kids like to help you bake), and it's top rack dishwasher safe, so it cleans up very easily. (I'll show you what I turned these cupcakes into in just a minute).

Then on my actual holiday, I found Ghiradelli Square, in San Francisco had a lot to offer in the way of cupcake products. Cupcake stands, cupcake aprons, cupcake paper, cupcake calendars, you name. It was difficult to choose what I liked best. I picked up these two little cuties in a shop filled with cupcake shaped things.
The bigger cupcake on the left is a little container, it opens up and can hold jewelry, spare change, paper clips, whatever you like. The littler cupcake on the right opens up to reveal a good sized pot of hand cream.  The hand cream inside smells like chocolate (which honestly I don't particularly like, I may just empty it out and put a different smell, maybe one from CAKE, which I love). Too cute to pass up. In this same store they also sold these adorable bath bombs.
Yup, you read right. These are not edible, these are bath bombs. Throw them in the tub and they dissolve and fizzle and create yummy smells in your bath water. Pretty neat, yes?

In another shop I found a few more things I just had to have. Look at these adorable sticky notes...
Sorry, the picture didn't come out too clear. The larger pad on top is about the size of a post-it, with 4 different design pull tabs on the bottom. Who wouldn't want to receive a note, or have a page marked with these little cuties?!

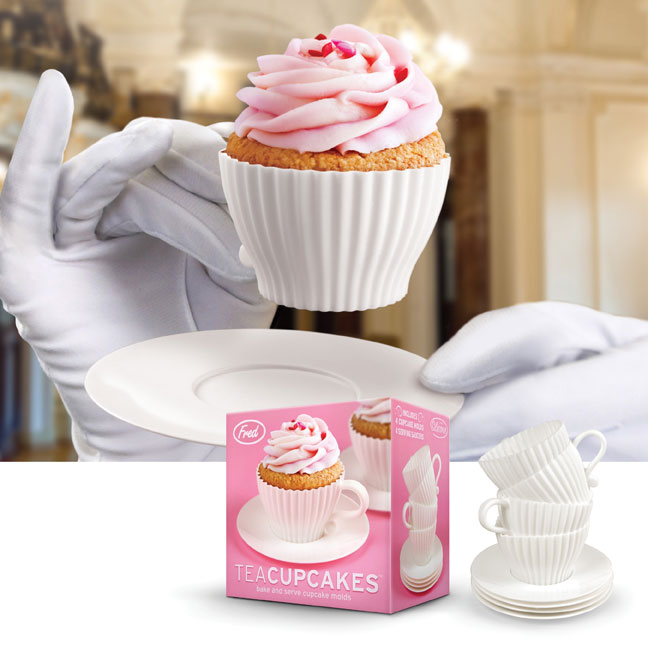
I also was delighted to find silicone cup and saucer cupcake bakers. I had seen these online over a year ago, and completely forgot to order them. Well, when I saw them in the store, I snapped them up then and there.
This is a set of 4 by Fred, and they are adorable silicone cups that are oven safe, they look just like tea cups and even come with the saucers. I can just imagine little girl's having a tea party with an extra surprise, forget imaginary 'pink' tea, you've got cupcakes! Fred has some really fun and quirky products; google them and maybe you'll find something fun for your next party.

As soon as I got back from holidays I had two big orders back to back. The first was for a sweet little girl's baptism. For her I created this beautiful pink pearlescent cross cake.
Another triple chocolate cake... the third one this month. It's really difficult to tell what my most sold flavor is......
To go with this cake I made 9 dozen (yes I said 9) cake pops. Three dozen purple, three dozen pink, and three dozen lilac with white pearl crosses.
So pretty, and just perfect for a little girl. They had beautiful shimmer and sparkle to them. Oh, here's my chance to show off one of my new pop stands. It perfectly holds, dries, and displays 36 cake pops. It's hard to see in the picture, but it's accented with words like chocolate and strawberry, has little cupcakes and lollipops on it... it's just so cute!
I'll get a better picture of the stand at some point. But look how nicely it displays the pops!

A day after all of these pops were delivered a little boy was having his first birthday, and the party theme was Mickey Mouse. A Classic! I created these Mickey Mouse shaped cake pops for his birthday.
And to go with these pops, what else, but cupcakes! Remember when I was showing you the banana chocolate chip batter in the cupcake pen, those cupcakes became Mickey and Minnie Mouse ring topped cupcakes.
Here's a close up to show you the bright colours and cute rings. These were beautifully displayed at the party on the Mickey Mouse Clubhouse cupcake stand, by Wilton. *I rent out the cupcake stands with a cupcake purchase... it really adds an extra something special to a party, I think*

I love the Mickey Mouse ears on top of the stand, inside are views of different rooms of the clubhouse and I love how the stand shows off the great Mickey Mouse Clubhouse baking cups. Bright fun colours, showing Mickey, Minnie, Daisy, Donald and more!

I think that's about all for this month...
Oh, I also received my spinningleaf molds in the mail, and can't wait to get started on making some cake pucks/cake bites. Hold tight, and I'll show you what I make with my new molds next month.

Until next time,
Happy baking, caking, and decorating!

Love and sprinkles, xoxo

>>>Have questions about any of the products I've shown? Looking to purchase a cupcake pen of your own? Want to know about the shops in Ghiradelli Square? Please comment below!<<<